Pink Onyx Slab Supplier: Color Range, Resin, Backlight Tests, and Full-Slab Approval
The first thing I notice is not pink. It is the pale amber band floating under the polished face, thin as tea held to a window. Beside it, a cooler rose layer turns almost opaque, then opens again around a white crystalline seam. Front light shows a beautiful slab. Backlight reveals an entirely different composition.
A pink onyx slab supplier has to show both readings. A small face sample can confirm color and finish, yet it cannot describe the slab’s translucent map, resin line, backing, repair, weak zone, or the way a large vein will cross a joint.
The stone has formed through mineral-rich water depositing bands of calcite and other minerals over time. Those layers create the color changes and variable light transmission that designers value. They also make inspection and fabrication more demanding than a flat manufactured panel.
Read the Pink Onyx Slab Supplier Color Range
Pink onyx can move through pale shell, rose, salmon, ivory, honey, grey, white, and iron-toned bands. Some slabs are cloudy and quiet. Others carry sweeping linear structure. Mineral impurities and changes in deposition create that variation. The trade name does not promise one fixed hue.
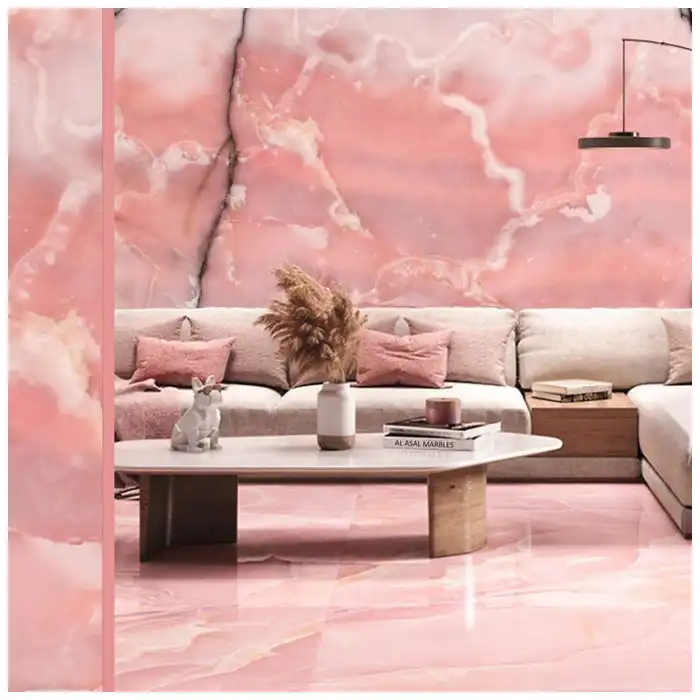
A pink onyx slab supplier should photograph every candidate slab square to the face, clean and dry, with a visible identity. The set includes the entire face, edges, back, resin, mesh or fiberglass, repairs, thickness, finish, and dimensions. Cropped photographs hide composition.
I compare slabs in sequence. If they were cut from the same block, neighboring slabs may support bookmatching or flow matching. The veins will tell you where the rhythm continues and where the stone changes pace. Slab numbers need to preserve that sequence.
Full-slab color approval uses both the quietest and strongest material proposed for the project. A designer who approves only a pale area may be surprised by a rust-colored band in the installed wall. A realistic range protects the stone’s character without pretending variation is error.
The existing Pink Onyx Marble Guide 2026 is the broad material and application reference. This page stays with supplier evidence and slab approval before fabrication.
Current Lastre di marmo di onice rosa offer one product route for full-face selection, while Lastra di onice rosa provides another comparison point. The actual project set still controls color and translucency.
| Slab evidence | What it reveals | Design decision | Fabrication risk |
|---|---|---|---|
| Front-lit complete face | Color, band direction, cloudy fields, visible repairs | Primary composition and slab sequence | Strong feature lands at joint or cutout |
| Backlit complete face | Transmission, opaque zones, resin shadows, thickness changes | Lightbox zoning and panel placement | Uneven glow or visible support shadow |
| Back and edge record | Fiberglass, mesh, resin, repairs, lamination | Adhesive, support, edge, and machining approach | Backing conflicts with light or bond |
| Measured slab register | Usable size, thickness, sequence, restricted zones | Panel layout and spare strategy | Gross area fails to produce required composition |
Look at the edge before calling the color uniform
The polished face compresses depth into one plane. The edge shows layers. A pale band may sit near the face while a darker zone lies beneath it. Thin fabrication, edge lighting, and mitred returns can reveal that structure differently from a full-thickness face.
This stone has been waiting for millions of years, although individual deposits and formations have their own geological histories. The point is not the number. The point is that mineral deposition created a three-dimensional material. Supplier evidence should respect that depth.
Map Translucency before Designing the Backlight
Backlighting does not make every part equally bright. Calcite-rich pale bands may transmit more light. Denser mineral zones, repairs, resin concentrations, backing, thickness variation, and support can reduce or change transmission. The light test needs the whole slab.
For a pink onyx slab supplier, the useful test uses controlled light distance, a known source, stable exposure, and a consistent method across candidate slabs. The images show the complete panel and close details. Phone auto-exposure can flatten the differences, so the record includes settings or a visual reference where practical.
Map bright, medium, and low-transmission zones. Then place panel joints, focal areas, shelves, outlets, signage, structural supports, and service access around that map. A dark band can be beautiful when intentional. It looks like a failed light source when the design expected uniform glow.
Light color changes the material. Warm sources pull amber and peach forward. Cooler sources emphasize pale pink, grey, and white crystalline lines. Dimming changes brightness and the perceived balance of opaque and translucent areas.
Il Pink Onyx Wall Panels: Bookmatch, Lightbox Depth, Joints, and Corner Returns article develops the architectural assembly. At supplier-selection stage, I need enough test evidence to know which slabs deserve that assembly.
Test a real edge and joint
A full-face glow can distract from the joint. Produce a small assembly using the intended thickness, edge finish, backing condition, joint, support, diffuser, and light distance. Look for hot spots, shadows, adhesive lines, visible fiberglass, and color change at the edge.
If thin onyx is laminated to glass or another substrate, the assembly changes transmission and fabrication. The responsible design and engineering team specifies the build-up. Test the actual materials instead of assuming a photograph of solid slab predicts the composite.
The Hard-Won Lesson: Backlight the repair before approving the cut
A resin line can sit quietly inside the pink field under front light and become a darker ribbon when illuminated from behind. If the proposed wall cut places that line across the center of a panel, the repair becomes part of the composition. Moving the cut may place it near a joint or outside the focal zone, but that option disappears after fabrication.
The Lesson: Review every repaired and backed zone under the intended light before nesting the panels.
Inspect Resin, Fiberglass Backing, Repairs, and Thickness
Onyx slabs may receive resin and fiberglass or mesh reinforcement because the layered material can contain natural fissures and fragile zones. Reinforcement can support handling. It also affects cutting, bonding, backlighting, edge finishing, and the visibility of repairs.

A pink onyx slab supplier should disclose the treatment present on each candidate slab. Back photographs show coverage. Close images identify overlap, loose fibers, thick resin, patched zones, and labels. The project team then decides what remains, what is removed, and which installation materials are compatible.
Thickness measurement needs a defined method and several points. Variability can influence transmission, edge alignment, panel level, and support. A nominal number is not a map. For backlit work, thickness and light tests should be read together.
Repairs are judged by location and light behavior. A well-executed fill at an opaque corner may be acceptable. The same repair across a thin backlit edge may attract attention. The veins will tell you where the eye travels, and the repair map should follow that visual path.
The detailed Reading Onyx Slab Resin and Fiberglass Backing before Cutting article provides the separate fabrication review for treatment, translucency, adhesive tests, cutouts, and edges.
Do not mistake reinforcement for structural design
Fiberglass on the back does not automatically define the panel support, anchor, frame, adhesive, or safety factor. Those belong to the engineered assembly. The reinforcement record tells the designer what exists; it does not replace calculations or system testing.
Large panels, thin sections, cutouts, cantilevers, furniture tops, and public-area installations may need specialist structural review. Onyx’s beauty encourages ambitious use. That ambition must be carried by a buildable support system.
Plan Yield, Sequence, Cutouts, Edges, and Fabrication
Gross slab area says little about usable composition. Nest the actual panels on the front-lit and backlit map. Avoid restricted repairs, fragile zones, strong bands at wrong joints, and opaque areas where the design expects glow. Add cutting margins, kerf, edge work, matching, and spares.
A pink onyx slab supplier should preserve slab sequence and proposed cut positions. Bookmatched pairs need neighboring faces and a confirmed opening method. Flow-matched panels need continuous direction. Random rotation can turn a calm horizontal layer into conflicting movement.
Cutouts interrupt both strength and image. Outlets, switches, signage, basins, drains, faucets, and fixings need corner radii, support, edge finish, and light planning. A white crystalline band crossing a cutout may chip differently from a dense rose field.
Edges can be polished, eased, mitred, laminated, framed, or concealed depending on the application. Test the chosen detail on representative material. The edge may transmit light more strongly than the face or expose backing and resin unless the assembly controls it.
First-piece fabrication should include the final finish, edge, joint, backing condition, light test, and support interface. Inspect front-lit and backlit. A sample that passes only with the lights off is not a backlit approval.
Keep the design free from false uniformity
A diffuser and well-spaced light source can soften hot spots, but they cannot erase the stone’s mineral map. Trying to force identical brightness can make the lightbox deeper, hotter, harder to service, or visually flat. Let some bands remain quiet.
True luxury is something you never get tired of looking at. Pink onyx holds attention because it changes with distance, daylight, and backlight. Supplier selection should preserve that complexity while giving the fabricator and designer honest constraints.
Build a Full-Slab Approval and Design Handover Record
The record includes slab IDs, sequence, front and back images, front-lit and backlit tests, dimensions, thickness points, finish, repairs, resin, fiberglass, translucency map, proposed nesting, edge sample, light assembly, and allocation. Each revision keeps the same identity chain.
For every pink onyx slab supplier decision, the designer signs what is accepted and where it will be used. A slab may suit a tabletop under ambient light but not a fully backlit feature wall. Acceptance is application-specific.
Photographs cannot reproduce every color accurately. Keep physical samples for finish and color reference where practical. Use images to preserve composition, identity, and light behavior. Note the limitations of screens and automatic white balance.
If the offered slab changes before cutting, pause. Compare the replacement under the same front-light, backlight, treatment, thickness, and yield method. Update panel composition. Do not insert a “similar pink” slab into a sequence without design approval.
When a site issue appears, photograph the whole installation with lights on and off, record panel and slab codes, and stop modification. Compare the light assembly, backing, repair map, pre-shipment evidence, and installation. Contact the supplier with those records before polishing, grinding, removing backing, changing light distance, or replacing panels.
Quick-Reference Checklist for Pink Onyx Slab Approval
- Compare complete clean slabs under front light with visible IDs and preserved sequence.
- Backlight each candidate using one controlled method and map bright, medium, and opaque zones.
- Photograph resin, fiberglass, mesh, repairs, thickness, and edge conditions from the back and side.
- Nest actual panels on both the color composition and translucency map.
- Test the intended edge, joint, backing, diffuser, light distance, and support as one small assembly.
- Preserve slab-to-panel identity through fabrication, packing, installation, and spare storage.
- Pause when substitute slabs or treatment changes alter the approved light behavior.
What Makes a Pink Onyx Supplier Decision Credible
Why front light is only half the evidence
Front light shows color, polish, bands, and visible repairs. Backlight reveals transmission, opaque zones, resin shadows, backing, and hidden structure. A backlit design requires both views because each answers a different material question.
What supplier transparency should include
Transparency means stable slab IDs, complete images, measured dimensions, treatment disclosure, repair maps, light tests, sequence, yield, and the willingness to pause when the offered condition differs from approval. It does not mean pretending the stone is uniform.
When another slab is the better choice
Choose another slab when the color range conflicts with the interior, translucency does not suit the light concept, restricted repairs consume critical yield, dimensions fail the composition, or backing and fabrication cannot meet the assembly. A beautiful slab can still be wrong for one design.
Frequently Asked Questions
1. What should a pink onyx slab supplier show before approval?
Ask for complete front and back photographs, slab IDs, sequence, dimensions, thickness, finish, resin, fiberglass or mesh, repairs, front-lit and backlit tests, translucency maps, usable yield, proposed cut layouts, and representative edge or assembly samples.
2. Does all pink onyx transmit light evenly?
No. Mineral bands, density, thickness, resin, repairs, backing, and structure create bright and low-transmission zones. Test the complete slab under one controlled method and design around the real map.
3. Is fiberglass backing a defect?
Not automatically. It can reinforce fragile stone during handling. Its presence must be disclosed and evaluated for fabrication, bonding, light transmission, edge treatment, and the engineered support system.
4. Can a small pink onyx sample approve a feature wall?
No. It can indicate color and finish, but not full composition, sequence, translucency, repairs, backing, panel yield, joints, or light behavior. Use full-slab evidence and a representative illuminated assembly.
5. What should happen if a backlit panel shows an unexpected dark line?
Photograph the complete panel with lights on and off, record its slab and panel codes, and pause modification. Compare the condition with resin, repair, backing, thickness, lightbox, and pre-shipment records, then contact the supplier before grinding, changing backing, or replacing the panel.
Final Conclusion
A pink onyx slab supplier earns confidence by revealing the complete material under front light and backlight, including treatment, repairs, thickness, yield, sequence, and edge behavior. The veins will tell you where the composition wants to move, and MQ STONE would rather preserve that honest mineral depth than force a fragile slab into a design that only admired its color.
References
- Dimension Stone Design Manual, Natural Stone Institute.
- ASTM C119 Standard Terminology Relating to Dimension Stone, ASTM International.
- Slab Handling and Safety Guidance, Natural Stone Institute.
- Stone and Light in Interior Applications, Natural Stone Institute technical guidance.
- Lighting Handbook, Illuminating Engineering Society.
- Material and Craft Programme, Maison&Objet Paris 2026.
- Onyx marble, Wikipedia, English edition.