Backlit Onyx Lighting Mock Up for Wall Diffuser and Support Before Fabrication
Switching on a test light behind onyx often reveals two designs at once. The first is the stone: pale calcite bands, dense mineral layers, repaired zones, and natural changes in translucency. The second is the hardware behind it: LED dots, diffuser texture, support bars, seams, and cavity reflections. A successful wall keeps the first visible and controls the second.
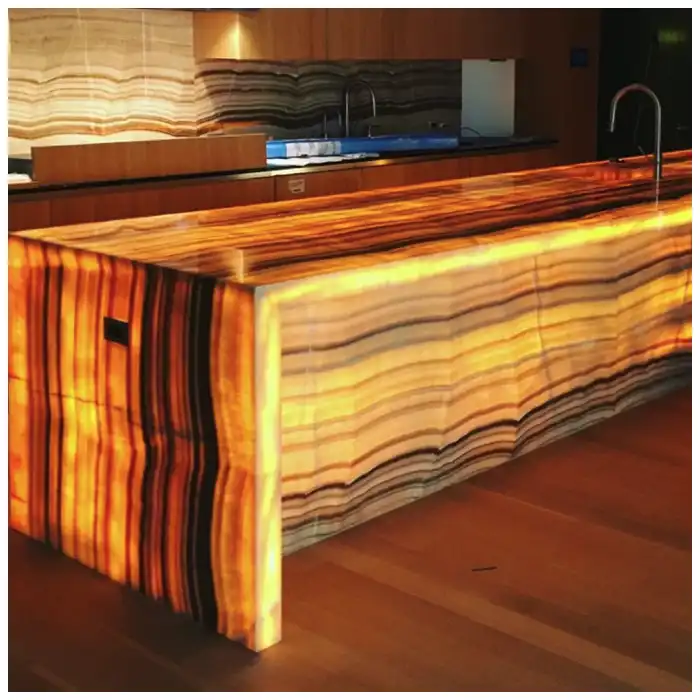
The mock-up must use the selected face or a truly representative panel, together with the intended thickness, finish, joint, backing, support, light source, diffuser, cavity depth, dimming, and room light. A phone flashlight behind a small sample answers none of the full-wall questions.
What a Backlit Onyx Lighting Mock Up Must Test
A backlit onyx lighting mock up tests identifiable slab or panel, thickness, finish, backing, repairs, joint, support pattern, light source, pitch, diffuser, cavity depth, reflective surfaces, color temperature, dimming, heat management, electrical access, room light, and viewing distance. It should answer both aesthetic and service questions.
The broader material relationship remains Luxury Natural Stone Slabs and Furniture: Complete Guide to Materials, Applications, Edges, Lighting, and Support. Onyx sits inside that world as a translucent natural material, not a decorative light shade. The face, edge, joint, and mineral bands should remain legible when the system is on and off.
I begin with the actual selected face whenever possible. Small samples can identify general translucency but cannot show large opaque bands, repairs, seams, or bookmatched transitions. Then, the backlight turns on.
Map translucent, opaque, and repaired zones
I photograph the slab in front light and transmitted light with stable exposure. Pale calcite bands may open brightly. Iron-rich or dense zones may remain dark. Resin and repairs can transmit differently. The slab test shows where light can pass, while the complete mock-up reveals how the stone, diffuser, cavity, and source behave together.
An China Wooden Beige Onyx Slab may carry linear bands that become architectural when lit. Their direction can support a tall wall or long counter front. Turning the face changes both movement and how the diffuser reads behind it.
Diffuser Distance, LED Pitch, and Cavity Depth
An onyx wall diffuser helps blend point or linear light sources before the light reaches the stone. Distance matters. Too little space can reveal dots and strips. More space may improve blending but increase cavity depth, reduce efficiency, and affect the wall build-up. The lighting designer and system suppliers set the technical solution.
I photograph the onyx wall diffuser position with a measured cavity reference so the approved spacing can be rebuilt at full scale.
I test more than one dimming level and both darkened and normal room conditions. A wall that looks even at full output may show a grid when dimmed. A lobby with daylight may need another balance from a bar or spa viewed at night.
Color temperature changes mineral color. Warm light can deepen amber and cream bands. Cooler light can sharpen pale or green zones. Tunable systems add flexibility and another approval responsibility. I approve the range that keeps the wall readable during normal use, not the setting that looks dramatic for five minutes and harsh for five years.
| Mock-up variable | What to observe | Decision to record |
|---|---|---|
| Selected onyx face | Translucent, opaque, repaired, and strongly banded zones | Panel allocation, orientation, and accepted natural behavior |
| Light-source pitch | Dots, stripes, overlap, dimming behavior | Fixture layout and output range |
| Diffuser type and distance | Blending, brightness loss, color shift, visible texture | Approved diffuser and cavity position |
| Support and joints | Dark bars, clips, seams, shadow width | Frame layout, bearing, joint, and concealment method |
| Cavity surfaces | Reflections, hotspots, color contamination | Approved backing and internal finish |
| Room lighting | Competition with front light, glare, day-night balance | Scene, dimming, color temperature, and controls |
| Service access | Replacement route for drivers, strips, panels, controls | Access panel and maintenance responsibility |
Support Shadows, Seams, and Panel Edges
Backlit stone support shadows appear when structural or fixing elements interrupt transmitted light. A support that disappears behind one dense band may become obvious behind a pale crystalline zone. I place the support drawing over the actual slab image and test critical intersections.
Joints need equal attention. A dark open seam, translucent adhesive line, edge strip, or misaligned bookmatch can become stronger under light. The published Bookmatched Stone Walls guide helps establish sequence and trimming before the light box adds another layer.
Onyx panel bookmatching is not simply mirroring two photographs. The panels need true sequence, compatible thickness and finish, controlled trimming, stable support, and a joint that works in front and transmitted light. whether the meeting feels like one mineral event or two panels pretending.
I test onyx panel bookmatching with the light on and off, because the center seam can change character when mineral density becomes visible.
Electrical Access, Heat, and Maintenance
The lighting designer and qualified electrical team specify fixtures, drivers, controls, wiring, heat management, ventilation, and access under applicable requirements. My role is to make the stone and support consequences visible. A driver should not require removing the best panel whenever service is needed.
I ask how technicians will reach failed components, how dust will be controlled inside the cavity, and whether replacement fixtures can reproduce output and color. A beautiful wall with no service route is unfinished design.
Сайт Onyx Wall Panels: What to Confirm Before a Backlit Feature Wall Order keeps selection, fabrication, lighting, support, and access connected. I use the mock-up to close those questions with the real project components.
How to Approve and Photograph the Mock-Up
I record slab identity, dimensions, thickness, finish, backing, support, joint, light source, pitch, diffuser, cavity depth, color temperature, output or scene, camera exposure, ambient light, viewing distance, and approvers. Front-light and backlight images remain separate.
An Orange Onyx Stone Slab can move from pale amber to deep fire under light. The approval should not depend on one overexposed image. I include a neutral reference and video moving from off to several dimming levels.
I want the record to preserve how the mineral layers actually respond, including darker zones. Uniform brightness is not always the goal. Controlled natural variation can give the wall its depth.
Choose the right mock-up scale and commissioning record
A small sample box can compare diffuser and color temperature. It cannot prove a full-height joint, support grid, bookmatch, or viewing-distance effect. For critical walls, I prefer a representative bay that includes at least one real seam, support condition, and service detail. The project decides the necessary scale from risk and design importance.
After installation, commissioning records the approved scenes, dimming range, color setting, visible differences, access route, and baseline photographs. I view the wall from the main approach, seated positions, and close service distance. The system should remain composed when ambient lighting changes.
where the glow should gather. The commissioning record tells the future maintenance team which result the project accepted before dust, replacement fixtures, or control changes alter it.
Example: Overlay Support on the Selected Translucent Face
Example: a rectangular support grid may disappear behind dense bands but form a dark bar across a pale calcite cloud. Moving the grid after the panels are cut can change brackets, joints, and service access. Overlay the frame and fixture layout on the slab image, then test the most transparent intersection at full scale.
Decision rule: approve the stone, support, diffuser, fixtures, joints, controls, and access as one system before cutting final panels.
What the Mock-Up Must Settle Before Fabrication
Why even light is not the only goal
Onyx is naturally uneven in translucency. The goal is a controlled relationship between mineral bands and the lighting system, not a plastic sheet of uniform brightness. Some darker areas create depth. Hardware shadows and LED grids do not.

What the mock-up must represent
Use the actual or representative onyx, thickness, finish, backing, support, seam, light source, diffuser, cavity, dimming, and viewing distance. A sample lit by a phone flashlight cannot approve a wall system.
What to do when a hotspot or support shadow appears on site
Photograph the complete wall, close effect, lit and unlit face, control setting, and accessible cavity condition; stop closing or modifying the assembly; then compare the result with the approved mock-up, support drawing, fixture layout, diffuser, and slab map before contacting the responsible teams.
Frequently Asked Questions
1. How deep should a backlit onyx light box be?
A backlit onyx lighting mock up must establish the depth because there is no universal number. It depends on the selected stone, light-source type and pitch, diffuser, brightness, support, cavity surfaces, heat management, service access, and viewing condition.
2. Why do LED dots appear behind onyx?
The light source may sit too close, have unsuitable pitch or optics, lack enough diffusion, or interact with highly translucent zones. Dimming and camera exposure can also reveal patterns not obvious at full output.
3. Can support bars be hidden behind opaque bands?
Sometimes, but only after mapping the support against the actual face and testing it. Panel movement, joints, cutting, and light can shift the relationship, so the structural design cannot rely on a rough visual guess.
4. Should backlit onyx be bookmatched?
Bookmatching can create a powerful composition when sequential faces, trimming, thickness, finish, joints, support, and light are coordinated. It is not mandatory; some slabs work better as directional or individually composed panels.
5. What should we do first if the installed onyx shows dark bars or hotspots?
Photograph the wall lit and unlit, stop closing or altering the cavity, and compare the slab map, mock-up, support, fixture pitch, diffuser, dimming, and cavity depth before asking the supplier and lighting team to review it.
Quick-Reference Checklist for Backlit Onyx Mock-Up Approval
- Identify the actual onyx face, thickness, finish, backing, repairs, and joints.
- Map support bars, clips, seams, fixtures, and access points over the slab image.
- Test light-source pitch, diffuser, distance, cavity finish, and several dimming levels.
- Review warm, cool, ambient, daytime, and darkened-room conditions as required.
- Photograph front light, transmitted light, close details, and full viewing distance separately.
- Approve heat management, electrical access, driver replacement, and maintenance responsibility.
Final Conclusion
A backlit onyx lighting mock up must resolve the actual mineral face, diffuser, spacing, support, seams, dimming, room light, heat management, and service access before fabrication fixes the system.
MQ STONE would move a hidden support during mock-up rather than let it remain as a permanent shadow through the selected onyx.

References
- Dimension Stone Design Manual, Natural Stone Institute.
- C616 Standard Specification for Quartz-Based Dimension Stone, ASTM International.
- C503 Standard Specification for Marble Dimension Stone, ASTM International.
- C97 Standard Test Methods for Absorption and Bulk Specific Gravity of Dimension Stone, ASTM International.
- C880 Standard Test Method for Flexural Strength of Dimension Stone, ASTM International.
- Natural Stone: Geological Formation and Mineral Resources, geological survey references.
- Architecture and Interior Material Coverage, Dezeen.
- Search Essentials and Helpful Content Guidance, Google Search Central.